16 October 2026
When WSL 2 will not shrink: reclaim Docker Desktop's VHDX on Windows
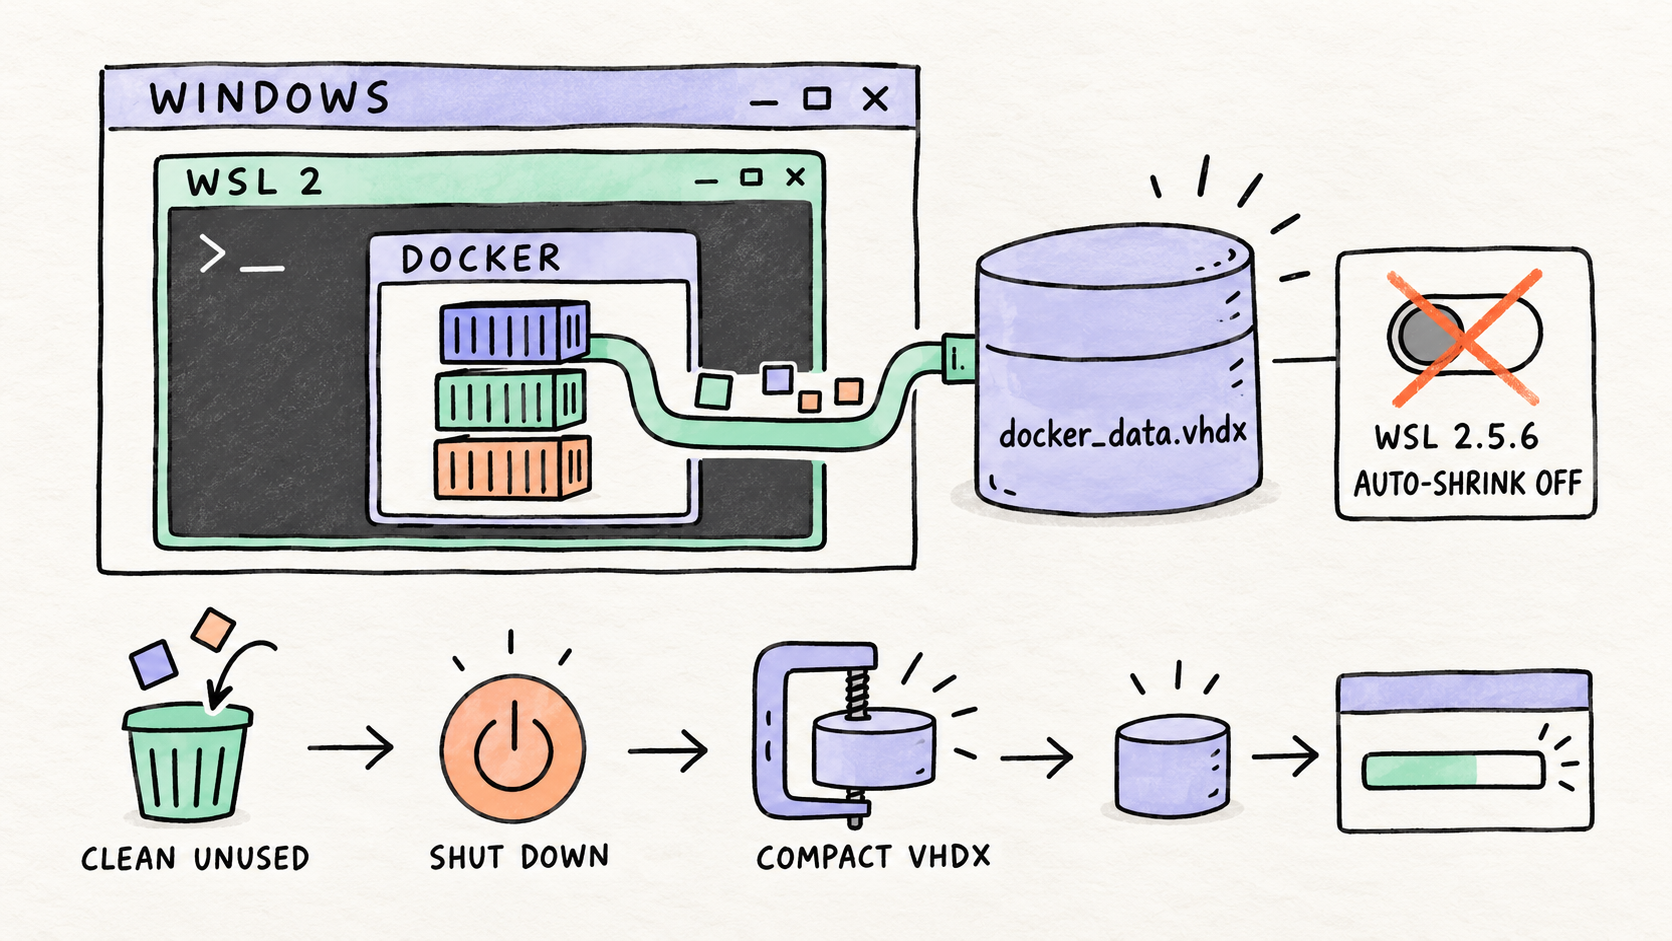
🧹 When WSL 2 will not give disk space back
Docker Desktop can fill a Windows drive surprisingly quickly. You remove old containers and images, docker system df looks better, but the large VHDX file on C: barely changes.
The missing step is usually compaction.
Deleting Docker data and shrinking the Windows file are separate operations:
- Docker deletes unused data inside its Linux filesystem.
- Windows compacts the VHDX and returns those free blocks to the host drive.
Compaction cannot remove live images, containers, build cache, or volumes. Cleanup has to come first.
The short recovery plan
- Identify the correct VHDX.
- Back up data you cannot recreate.
- Inspect Docker usage and remove only confirmed-unused data.
- Quit Docker Desktop completely.
- Run
wsl --shutdown. - Compact a registered distro with
wsl --manage <Distro> --compact, or compact Docker Desktop’s data VHDX with DiskPart. - Start Docker Desktop and verify your containers and volumes.
Do not delete the VHDX, run wsl --unregister, or add --volumes to a prune command just to get space back. Those shortcuts can destroy data.
First: identify which VHDX is large
There are two common cases, and they are not interchangeable.
| What owns the data | Typical file | Compaction path |
|---|---|---|
| A normal WSL distro such as Ubuntu | The distro’s ext4.vhdx |
wsl --manage <Distro> --compact when supported |
| Docker Desktop’s WSL 2 engine | %LOCALAPPDATA%\Docker\wsl\disk\docker_data.vhdx |
Quit Docker Desktop, shut down WSL, then use DiskPart |
Docker documents C:\Users\[USERNAME]\AppData\Local\Docker\wsl as the default WSL 2 data location. A custom location can be set in Docker Desktop > Settings > Resources > Advanced, so check that screen before touching a file.
Also confirm that Docker Desktop is using the WSL 2 backend. Its backup documentation lists different disk locations for WSL 2, Hyper-V, and Docker VMM.
For the default WSL 2 path, this PowerShell check is read-only:
$vhd = Join-Path $env:LOCALAPPDATA 'Docker\wsl\disk\docker_data.vhdx'
Get-Item -LiteralPath $vhd | Select-Object FullName, Length
If the file is not there, stop and check Docker Desktop’s disk image location. Do not guess between multiple VHDX files.
Check which side is actually full
Compaction solves a full Windows host drive only when the VHDX already contains reclaimable free blocks. Check all three views:
Get-PSDrive -Name C | Select-Object Used, Free
wsl -d Ubuntu -- df -h /
docker system df -v
Replace Ubuntu with the relevant distro name. If the Linux filesystem itself is full, delete unused data or expand that distro with WSL’s documented resize process. If Linux has free space but C: does not, compaction is the missing host-side step.
Why automatic sparse-VHD cleanup may not help
The experimental WSL setting is often shown like this:
[experimental]
sparseVhd=true
There are two catches.
First, Microsoft’s current WSL configuration documentation says this setting makes newly created VHDs sparse. It is not a command that compacts an existing Docker data disk.
Second, WSL 2.5.6, released as a pre-release on 2025-04-08, put sparse-VHD support behind --allow-unsafe. If you relied on sparse VHD auto-reclaim, this is the release where it stopped being a normally supported setting. That does not mean every WSL disk used to shrink automatically: ordinary non-sparse dynamic VHDX files still require compaction.
Current WSL source still disables sparse-VHD creation while potential data corruption is being investigated. WSL has an unsafe override, but forcing an unsafe storage mode is a poor recovery plan for a machine that is already low on space.
Docker Desktop’s Resource Saver is also unrelated. It reduces idle CPU and memory use by stopping the Linux VM; it does not promise to compact the disk image.
Before assuming the disk is still consuming its displayed maximum, open the VHDX Properties dialog and compare Size with Size on disk. Sparse files can have a large logical size while using much less physical space.
Make room inside Docker first
If Docker Desktop still starts, inspect before deleting:
docker system df -v
docker container ls -a
docker image ls
docker volume ls
Build cache is often the lowest-risk place to start:
docker builder prune
For the standard unused-data cleanup:
docker system prune
Read Docker’s confirmation list before accepting it. The default command removes stopped containers, unused networks, dangling images, and unused build cache. It does not remove volumes by default.
Avoid this reflex:
docker system prune -a --volumes
-a removes every unused image, not only dangling ones, and --volumes can remove volume data that is not attached to a running container. A database in a named volume may be the most important data on the disk.
If Docker will not start because C: is completely full, first create a little breathing room outside Docker—for example, empty the Recycle Bin or move an unrelated large file to another drive. Compaction cannot remove Docker objects that are still live, and recovery operations should not begin with zero free bytes.
Back up before compacting
If the Docker data cannot be recreated, back it up before editing the virtual disk.
Docker’s recovery documentation says that, with Docker Desktop fully stopped, the WSL 2 engine disk can be backed up from:
%LOCALAPPDATA%\Docker\wsl\disk\docker_data.vhdx
Use another drive if the system drive is nearly full. If Docker still works, also export important images and back up named volumes using the application-appropriate method. Copying or committing a container does not include data stored in an attached volume.
Option A: compact a normal registered WSL distro
Recent WSL clients expose a direct compaction command. Check locally rather than assuming your installed version has it:
wsl --help
wsl --list --verbose
If --compact appears under wsl --manage, close programs using the distro and run:
wsl --shutdown
wsl --manage Ubuntu --compact
Replace Ubuntu with the exact name from wsl --list --verbose.
This is the smallest supported path for a registered WSL 2 distro. It does not mean a separately managed Docker Desktop data disk will appear as that distro or be compacted with it.
Option B: compact Docker Desktop’s data VHDX
Use this only after confirming the backend and exact disk image path.
- Quit Docker Desktop from its system tray menu. Stopping containers is not enough.
- Close WSL terminals and editors using WSL files.
- Open PowerShell and run:
wsl --shutdown
- Open Terminal or Command Prompt as Administrator and start DiskPart:
diskpart
- At the
DISKPART>prompt, paste the confirmed absolute VHDX path:
select vdisk file="C:\Users\<you>\AppData\Local\Docker\wsl\disk\docker_data.vhdx"
detail vdisk
attach vdisk readonly
compact vdisk
detach vdisk
exit
Microsoft documents that compact vdisk works on a dynamically expanding VHD only when it is detached or attached read-only. If DiskPart says the file is in use, Docker Desktop or another WSL process is still holding it. Do not force the operation against a mounted disk.
On Windows editions with the Hyper-V PowerShell module, this is an alternative after the same shutdown steps:
Optimize-VHD -Path 'C:\path\to\docker_data.vhdx' -Mode Full
Optimize-VHD was not available in my local shell, so DiskPart is the more portable fallback for this guide.
If DiskPart reports that the file is sparse
Check the attribute from an elevated terminal:
fsutil sparse queryflag "C:\path\to\docker_data.vhdx"
DiskPart may reject a sparse VHDX. Do not immediately convert it back while the host drive is nearly full: changing the sparse state can itself require substantial space.
Instead:
- Compare Size and Size on disk in file Properties.
- Confirm whether Windows free space already increased after Docker cleanup.
- Back up important data.
- If the allocated size remains wrong, use Docker Desktop’s supported move, backup/reset, or reinstall recovery paths rather than forcing WSL’s unsafe sparse override.
Docker Desktop’s Troubleshoot > Clean up data resets its disk image and destroys local containers and images. That is a last resort, not a compaction shortcut.
Verify the recovery
Before and after the cleanup, record Windows free space:
Get-PSDrive -Name C | Select-Object Used, Free
After compaction:
- Start Docker Desktop.
- Run
docker infoanddocker system df -v. - Start the projects you still need.
- Verify important named volumes, especially databases.
- Recheck the VHDX Size on disk and Windows free space.
The VHDX will grow again as Docker pulls images, builds layers, and writes volumes. The goal is not to keep it permanently tiny; it is to reclaim blocks that are genuinely unused without sacrificing data.
Evidence
This guide is based on:
- Microsoft’s WSL disk-space documentation.
- Microsoft’s WSL configuration reference.
- Microsoft’s WSL 2.5.6 release notes.
- Microsoft’s
compact vdiskreference. - Microsoft’s
Optimize-VHDreference. - Current WSL source disabling sparse-VHD creation while corruption is investigated.
- Current WSL client source implementing
wsl --manage <Distro> --compact. - Docker Desktop’s WSL 2 backend documentation.
- Docker Desktop’s backup and restore documentation.
- Docker’s
system prunereference.
The command syntax in this guide was checked with WSL 3.0.3.0 and Docker CLI 29.8.2. Storage behavior is version-dependent, so confirm that --compact appears under wsl --manage in wsl --help before using it.